E14 | Paint Wainscoting, Sandbox | Ask This Old House
Season 23 Episode 14 | 23m 42sVideo has Closed Captions
Mauro paints wainscoting; what to know about home fuel options; Nathan builds a sandbox.
Mauro Henrique helps a homeowner paint his wainscoting by using an airless sprayer; Kevin O'Connor, Ross Trethewey, and Heath Eastman discuss how a growing number of homes are going all electric and how it compares with fossil fuels. They share what homeowners should research before making the switch; Nathan Gilbert helps two young brothers build a sandbox for their very own digging area.
Funding for THIS OLD HOUSE is provided by The Home Depot and Renewal By Andersen.
Support provided by:


E14 | Paint Wainscoting, Sandbox | Ask This Old House
Season 23 Episode 14 | 23m 42sVideo has Closed Captions
Mauro Henrique helps a homeowner paint his wainscoting by using an airless sprayer; Kevin O'Connor, Ross Trethewey, and Heath Eastman discuss how a growing number of homes are going all electric and how it compares with fossil fuels. They share what homeowners should research before making the switch; Nathan Gilbert helps two young brothers build a sandbox for their very own digging area.
How to Watch Ask This Old House
Ask This Old House is available to stream on pbs.org and the free PBS App, available on iPhone, Apple TV, Android TV, Android smartphones, Amazon Fire TV, Amazon Fire Tablet, Roku, Samsung Smart TV, and Vizio.
Keep Exploring


This Old House Insider Newsletter
Get This Old House exclusive stories, tips, and behind-the-scenes information delivered right to your inbox every month.Providing Support for PBS.org
Learn Moreabout PBS online sponsorship♪♪ Kevin: On "Ask This Old House," our experts travel across the country to answer questions about your house.
♪♪ Today, Mauro shows a homeowner a seamless way to paint his wainscoting.
Mauro: It dries really fast so we can get a lot of work done.
Kevin: Then Heath and Ross talk about the move to an all-electric house and what that means for homeowners.
And it's all hands on deck, big and small, when Nathan builds a sandbox.
Alexander: This is a lot of work, though.
Nathan: Yes, sir.
Kevin: On "Ask This Old House."
♪♪ Mauro: David?
David: Hi.
Yes.
Mauro: Nice to meet you.
David: It's nice meeting you too.
Thank you for coming today.
Come on in.
So, this is a kitchen renovation that I've been working on.
Originally it was two rooms.
Mauro: It looks great.
David: And so there was a wall here that separated the kitchen from the dining room.
Mauro: Right here.
David: Took the wall down.
Mauro: Okay.
David: Which then necessitated taking down all the wallpaper and sanding this from a lovely shade of green and sanding all of the door frames and the window frames.
But now I'm at the point where I need to paint it, and I'm not exactly sure where to go from here.
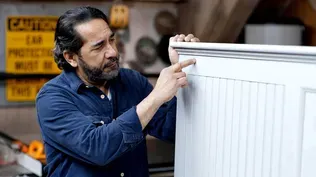
Mauro: Alright, looks like you've done some nice work on prep on the wainscoting.
What do you have for plans to do the colors and finish for this room?
David: So I know that I want to paint it white.
I know that I want to paint it with a semi-gloss paint because the rest of the molding in the house is also semi-gloss, and I want to make sure that it's consistent throughout.
Mauro: Okay.
David: But I don't know whether I should use a brush or I should use a roller.
Mauro: If you use a roller or a brush, it's going to add a little texture to it, some brush strokes or like little textures from the roller.
Is that what you're looking for?
David: No, I'm looking for something that would have just a very smooth sheen to it without any brush strokes.
Mauro: Alright.
In this case, what we should do here, we should do an airless sprayer.
Okay.
So it's going to give you a nice uniform finish.
But before, we have to prep this whole area.
David: Sounds great.
Mauro: Ready to go?
David: Let's do it.
Mauro: Alright.
I'll go get some stuff.
We'll be back and we'll go to work.
David: Okay, great.
♪♪ Mauro: Okay, Dave, I will vacuum the wainscoting and walls, and you can follow me with that cloth that will pick up any remaining dust.
♪♪ Using spray paint requires a lot more prep work than using brushes or rollers, because of the overspray that can occur.
♪♪ ♪♪ We'll cover the whole floor with the floor paper and drop cloth.
♪♪ Even though Dave will be painting the walls after this, we still want to protect them from overspray by using pre-taped mask and film.
Unfold the plastic.
Yeah.
And lift it up.
Alright, keep going.
Keep going.
♪♪ ♪♪ Alright.
We also need to block this doorway.
♪♪ There we go.
♪♪ Okay, Dave, we're ready to spray the primer, alright?
David: Yes.
Mauro: And for spraying the primer, we're going to use this airless sprayer.
David: Okay.
What does airless mean?
Mauro: Airless sprayers means you don't need to hook it up to a compressor because the machine does it all.
David: Okay.
Mauro: Alright?
We're going to pump the primer into the machine first.
I'm going to put the suction paint right in there.
Okay.
Now I'm going to turn on the machine.
See if they start going.
[ Whirring ] Once we start to see the white primer, the machine is pumped.
Alright?
We're going to turn this nozzle here to the spray mode.
[ Whirring stops ] Okay?
We got the hose.
[ Machine whirs ] We do need to take the water from the hose.
David: And why is there water in the hose?
Mauro: At the end of any paint spray project that you do, you're supposed to clean out the machine, take all the paint that's left on the hose and on the pump.
Okay.
To keep it nice and clean and it's ready for the next one.
See the primer?
David: Yes.
Mauro: That means we're ready to go.
Okay.
Let's go like this.
And we're going to be spraying this water-based primer which dries really fast so we can get a lot of work done.
We're spraying the primer with a 315 fit.
The first number you're going to multiply by two.
That will give you six.
That means you're going to have six feet to spend every time you spray it.
A sprayer requires more paint than brushes or rollers.
Expect to use roughly 30% more because of the paint loss from overspray.
It's all yours.
Let's see how you do.
Overlap by 50%.
Yep.
Just the dash should go all the way down with the gun.
Okay?
From here.
Start from here.
Go like this.
Look.
You go like this.
You go a little faster so the paint won't clog up, okay?
David: Okay.
Mauro: Faster.
Yep.
Alright.
This will take a couple of hours to dry.
We'll come back, we'll do a little more preparation, and then we're ready to apply the paint.
David: Sounds great.
Mauro: Alright, let's have lunch.
I'm hungry.
♪♪ Okay, we get something in here that needs a little patch.
Just a little bit of wood filler.
I do touch-ups after the primer is on, because any holes or cracks that needs to be patched should be easier to see.
Yep.
This is going to take about 15 or 20 minutes to dry, so we'll come back and lightly sand.
Nice, nice.
We're gonna do a little caulking.
This is the way I like to do it.
David: Nice and clean.
Mauro: Dave, we're going to use two different shapes of sandpaper.
Okay?
This little sanding block.
You will be great for this flat surface.
Alright?
You can go all the way down, back and forth.
Alright?
This is one for you.
Now, we have this sponge sandpaper, what we can get around this, trim the profile, the round pieces.
You can -- You can press it down like this.
But this little curve here is also great.
So you can go like this so you can get the whole piece done, alright?
David: Why do you typically sandpaper after you've done the primer before you put the actual paint?
Mauro: Because you're always going to have to sand every time you put a coat on and you're ready for the second or third coat.
It's good to sand it in between coats to get a good grip to the paint, and if there's any imperfections, little dust in it, they will take care of it.
David: Okay.
Mauro: Before we start spraying, we need to pump the machine with paint first.
David: Okay.
[ Whirring ] ♪♪ Mauro: The latex paint we are using is specifically for high-traffic areas.
It is durable and scuff-resistant.
♪♪ ♪♪ Our first coat of paint is dry, so we can lightly sand and vacuum again before adding the second coat.
♪♪ ♪♪ ♪♪ ♪♪ David: Wow.
Mauro: Oh, yes.
David: This looks absolutely amazing.
Mauro: It looks great.
David: It's unbelievable.
And the sheen is so great.
And there's no brush marks.
Mauro: The existing trim looks like it was just installed.
We came and we painted.
David: And it looks great.
Mauro: Dave, thanks for having me here.
David: Thank you, Mauro.
Mauro: Enjoy this beautiful room.
David: Thank you, I will.
♪♪ Kevin: Uh-oh.
An HVAC engineer and an electrician walk into a barn.
What are you two up to?
Ross: We're talking about the electrification movement and how that compares to fossil fuels.
Kevin: Ah.
It's a real movement, right?
People are trying to electrify their entire houses.
You see that.
Heath: More and more every day, so as we're building and a lot of municipalities are requiring us to put in electric heating, electric cooling, prep for electric charges, get everything ready to be purely electric.
But the one thing to consider is that the majority of our electricity doesn't come from a renewable source yet.
They're working on it, but it's not there yet.
Kevin: Yeah.
What are the sources of our fuel?
Ross: So propane, oil, and natural gas are the three that we see in most houses.
That's how the heating is done in most of the areas of the country.
And then you have obviously heat pumps that run on electricity, right?
And so there are pros and cons to all these decisions.
With fossil fuels you always have a risk of backdrafting.
There's a risk of a pipe leak, et cetera.
So there's concerns there.
With electric, it's "nice" because it's one source that powers up the entire house in terms of lights, receptacles, heat pumps for heating and cooling.
But you have to do your homework in terms of knowing what the price for that electricity compared to your oil, natural gas and propane options because they're all billed separately.
Right?
So electricity is billed to you in price per kilowatt hour.
Kevin: Right.
Ross: Right.
And propane and oil are billed to you in price per gallon.
Kevin: Right.
Ross: And natural gas is billed to you on a price per therm.
Kevin: Yeah.
That gets complicated.
Ross: Right.
So we want to put it on a levelized playing field.
And so what we did is we created a chart.
It's called a levelized price per kilowatt hour.
So if you know your electric utility rate right down here, and if you know your average efficiency for the heat pump over the heating season, you can figure out where you're at.
So if you take the national average at $0.16 a kilowatt hour and an average efficiency of a heat pump at 2.5, your net price per kilowatt hour is $0.06.
Kevin: And when you say the average efficiency of the heat pump, that's because the heat pumps are more efficient when it's warm out, but they start to lose efficiency when it gets really cold.
So you take that into account, put it in the chart?
Ross: Right.
We call that seasonal C.O.P.
or effectively looking at what is it, when it produces at 47 degrees versus at five degrees and averaging that over the heating season.
Kevin: So that's keeping us honest.
Ross: That's right.
Kevin: If we look at averages, is there like a headline that you can tell us?
Ross: Yeah.
So in general national averages, we see that electric with heat pumps is going to perform better in terms of your cost per kilowatt hour compared to LP, the propane option, and oil.
So usually that will win in that situation.
But natural gas gets a little bit interesting.
In some cases, the price per kilowatt hour for natural gas is actually less.
Kevin: Ah!
Ross: So you got to do your homework to figure out.
It really depends on where you are in the country.
Heath: Right.
So if you're trying to do it based on just cost and not necessarily going green, natural gas really may be the way to go for you.
Kevin: We've heard stories about people who have taken -- gotten rid of the natural gas, gone to all heat pumps, and have been like, "Wait, my bill is higher."
Heath: "My bill went up.
Why did it not go down?
Ross: That's exactly why the reason is.
However, if you're building a new construction home, right, you can lock in a lower rate of electricity because you can have solar on your roof that's supplementing and providing the energy, the electricity for those heat pumps.
Kevin: Right.
Ross: So now you can get to net zero.
But in most cases that's going to be either a very high-performance envelope that's super-well air-sealed to get the load down to then make it work with heat pumps and solar.
Kevin: New home with efficiency and a little bit of electric on the roof, I can get that.
Ross: Makes perfect sense.
Kevin: Let's just take that off the table because not everyone lives -- Most people don't live in a new home.
Let's talk about our existing homes where we got to go through this analysis for conversion.
Ross: Yeah.
Kevin: Like, can a homeowner figure this out on their own?
Heath: I think you need a pro to really at least do that calculation for you to get you started.
Ross: It does get complicated.
That's why we made the charts to try to, you know, put a step in the right direction, make it a little bit easier to understand, but it's still complex.
And the other thing too is the existing infrastructure in the house, like how the existing house is heated and how the existing house is cooled does matter, right?
So like if you have baseboard heating, right, you can -- you know, you might have a system that's designed for a very high-temperature water supply.
If it's a 160- or 180-degree Fahrenheit water that you need to supply, heat pumps can't get you there yet, so the heat pumps might only be able to give you 120-degree water.
So what ends up happening is we get to these what we call dual-fuel hybrid systems, where the heat pump provides the majority of the heating, provides that 120-degree water to that radiator system, as an example, but when it gets really cold out and we go below what we call the balance point where the heat pump can't keep up with the heat lost to the building, then we bring on the existing oil, propane, natural gas boiler to supplement that energy.
Heath: It's a nice setup because you leave your existing system in place but you're also getting the efficiency of the heat pump, so you can run that for the majority of the year when it can't keep up.
Picture the heat pump as stage one.
Stage two kicks in when it's a zero-degree day, brings you back up to temp and then when it's satisfied, turns back off.
Kevin: So let me see if I can summarize.
When it comes to price, electricity wins some of the time.
Not all of the time.
If I want to go all-electric, the best chance I'm going to be is if I have a new house with a little bit of solar.
Heath: Right.
Kevin: And then other than that, a retrofit's probably going to put me into some sort of a dual situation?
Fair?
Ross: Basically, yeah.
Unless you're doing a full kind of deep energy retrofit, they call it where we're really air sealing and insulating that building well, but if you've got an 1860s house and try to get that to perform well, it's a massive cost to get that.
Heath: The return on investment is just so far.
Kevin: Cool.
Alright.
Well, great information.
Love the "smaht chahts."
Ross: There you go.
♪♪ Nathan: Hi, Liana.
Nice to meet you.
Liana: Hi, Nathan.
Thanks for coming out.
Nathan: Absolutely.
Who are these guys?
Anthony: Anthony.
Nathan: Anthony, nice to meet you.
What's your name?
Alexander: Alexander.
Nathan: Alexander.
Nice to meet you.
Liana: We wrote in because we'd love some help building a sandbox.
Nathan: Absolutely.
Anthony: And we love to dig.
Nathan: You love to dig?
I love to dig, too.
Anthony: He loves to dig, too.
Nathan: You like to dig, too?
We could do some digging today.
First things first, where do we want to put it?
Anthony: Can we put it over there?
Alexander: I want to put it over there.
Nathan: Let's take a look over here first.
Alright?
Alexander: Okay.
Liana: Yeah.
So we were thinking around here.
Nathan: Okay.
Liana: Just because it's pretty shady.
And not a lot of grass grows here anyways.
Nathan: Yeah.
Liana: And as you can see, the kids' toys are in this area anyway.
Nathan: Yep.
I think this is a great spot.
It looks fairly level.
Um, we don't want to have to dig down too much or bring in any fill to make it level.
So I think this spot would be perfect.
If you guys want to clear the toys out of the way, I'll go get some materials and we can get started.
Liana: Okay.
Thanks.
Nathan: Alright?
Liana: Alexander, you want to move the skateboard?
Remember, watch where you going, okay?
Nathan: So, I picked up some pressure-treated 4x6'.
This pressure-treated stock is going to last for a long time.
We'll start by making three kits that'll make three courses.
[ Saw buzzing ] ♪♪ ♪♪ ♪♪ ♪♪ ♪♪ Alright.
This is what I was thinking for a sandbox.
It's made out of 4x6 pressure-treated stock, so it'll last for a long time.
Um, luckily, we have a great grade here.
It's nice and level, perfect down this end.
We rise up a little bit here, a little high in this corner.
So I think we'll just take a rake and just kind of soften it a little bit, and then we'll assemble the pieces and start building up.
First -- Alexander: I like it.
Nathan: Oh, you like it?
I'm glad you like it.
Anthony: I love it.
Nathan: Do you like it?
Alexander: Yeah.
Nathan: You guys ready to start putting some stuff together?
So let's clear this out of the way.
We'll soften the grade, and then we'll start bringing it back in and start assembling, okay?
Liana: Awesome.
Nathan: Alright.
♪♪ To start, I'm going to fasten the corners with some timber screws.
♪♪ ♪♪ Alright.
So there's two things I want to check.
We know we're level but I do want to check it for square.
And I want to check it for the distance off the fence panel so it looks nice and even along the edge.
Let's check for square first.
So grab the end of this tape.
Go over to that corner.
Hook me right on that tip.
So I'm going to read my tape.
I've got 102 inches.
So now you go to that corner and I'll go to this one.
Alright, 102 inches.
So we know we're perfectly square which is great.
Now I'm going to check the fence panel.
31 inches.
And...31 inches.
And that really is just so it's aesthetically kind of pleasing.
It's equally cool off the fence.
We're nice and square.
Let's put some weed fabric in and I'll explain why in a second.
Alright?
Alright.
Next up is we're going to put down some of this weed fabric.
And the reason we're going to do that, we're really not worried about weeds as much as our play sand mixing with this mulch and soil below it.
So if you go down that end, Alexander.
Anthony: On that end.
Nathan: Then you grab this end.
We're going to roll this across.
Keep rolling, keep rolling, keep rolling.
Alright.
Watch your step.
Go up and out.
Alexander: That'll make it smooth.
Right?
Nathan: Yes, sir.
Alright.
Let's turn directions.
Alright.
One of you holds one end, the other one roll it out.
Alright, nice.
Alright.
Now let's put the next layer on.
So what we got is middle kit.
So what they're going to do is overlap, right?
So the the ends are going to be longer this time.
Alexander: Yeah.
Nathan: And the sides will be a little bit shorter.
Sound good?
Boys: Yeah.
Nathan: Alright.
Come stand on this one right here.
With all your weight on that right there.
Perfect.
♪♪ So now we can lock in that second course down to the first one.
I'm going to start it.
You're going to finish it.
Alright?
Pull that trigger and push down real hard.
♪♪ ♪♪ Alright.
What do you think about adding a little seat in the corner here?
Anthony: Yeah.
Nathan: Somewhere to sit?
♪♪ Alright, so the last thing I want to do before we add sand is I'm going to take my router and add a roundover to the edge.
Um, keep you guys from getting any splinters and make it nice and safe.
I'll cut them open.
You guys spread it out.
Boys: Alright.
♪♪ Alexander: This is a lot of work, though.
Nathan: What are you doing?
You're not stopping, are you?
Alexander: Nope.
I'm still doing it.
Nathan: Alright, guys, no sandbox is complete without a nice piece of machinery.
Put that in there.
Alexander, you want to give it a try?
Alexander: Sure!
Nathan: Alright.
Let's see your operating skills.
It's nice and sturdy.
Take a big scoop.
Alexander: Aaaaaaaaah.
Nathan: Nice job.
The sound effects are perfect.
Alright.
Only one rule -- Keep the sand in the box, okay?
Alexander: Yeah.
Liana: [ Laughs ] Nathan: Alright.
Liana: Awesome.
This looks great.
Anthony: Yeah.
I love it.
Nathan: Absolutely.
Well, thank you for all your help today, boys.
Liana: Thank you so much.
We appreciate it.
Nathan: Enjoy it.
See you.
Liana: Thank you.
Awesome.
Anthony: Alex, pour it in there.
♪♪ Alexander: [ Speaking indistinctly ] ♪♪ Kevin: Next time on "Ask This Old House," Ross heads to Austin to visit a company that is 3-D-printing homes.
Ross: It almost looks like soft serve coming out.
That is cool.
Kevin: Then we meet a landscaper who is passionate about making Detroit grow and flourish, and Tom shows us how to turn a square bowl.
♪♪ All that on "Ask This Old House."


Funding for THIS OLD HOUSE is provided by The Home Depot and Renewal By Andersen.